

More on EZ + VD Setup
EZ + VD follow-up
Before diving into this, make sure you’ve read the Quick Setup Guide. This post expands on that with more in-depth info for getting the best image quality and performance in Contractors Showdown ExfilZone using Virtual Desktop (VD).
Key Points
The VD Discord is the most reliable source for info and help. Pay special attention to posts from ggodin (the developer).
The Virtual Desktop FAQ on Reddit also offers explanations for VD’s options.
Going over 100% render resolution brings minimal visual gains (as stated by Guy Godin).
Turn Sharpening up!
Sharpening
AMD FidelityFX Contrast Adaptive Sharpening (CAS) dramatically improves clarity with negligible performance loss.
In VD: Under Streaming > Sharpening, set between 80%–100% (I use 100%).
Alternatively, you can use Reshade to use CAS, but it’s not beginner-friendly. Start at VRToolkit.
Virtual Desktop Settings (PC)
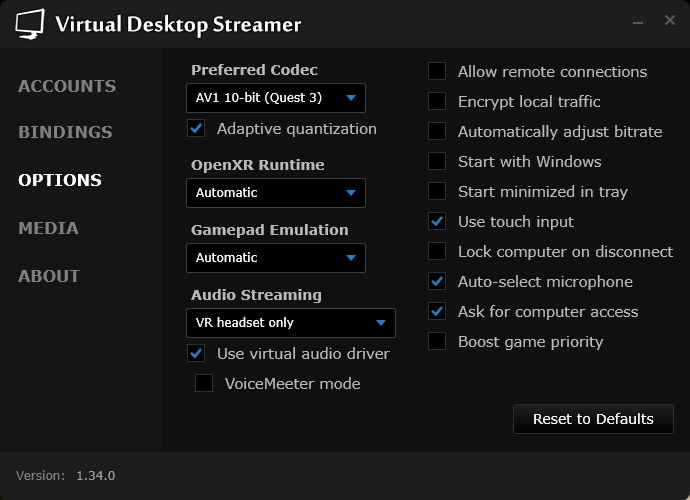
Codec
Choose based on your hardware:
H.264: Lowest latency, lowest efficiency.
H.264+: Low latency, better quality, high bitrate.
HEVC: Higher latency, more efficient.
AV1: Highest efficiency, needs NVIDIA 4000/AMD 7000 + Quest 3.
I toggle between AV1 at 200 Mbps and H.264+ at 500 Mbps. What works depends on your router and hardware.
Router Tip: If you don’t have a dedicated router, consider Kevin. Kevin handles H.264+ at 500 Mbps on both 5GHz and 6GHz. Quest 3 struggles to stay locked at 2400 Mbps on 6GHz for me, so try 5GHz if you’re seeing dips.
OpenXR Runtime
Stick with SteamVR (default). You can try VDXR, but I saw no benefit.
Automatically adjust bitrate
Auto Bitrate (recommended): VD runs a 10 MB test at connection to find your max stable bitrate.
Manual: For advanced users. Boosts quality at the risk of stutters.
Virtual Desktop Settings (headset)
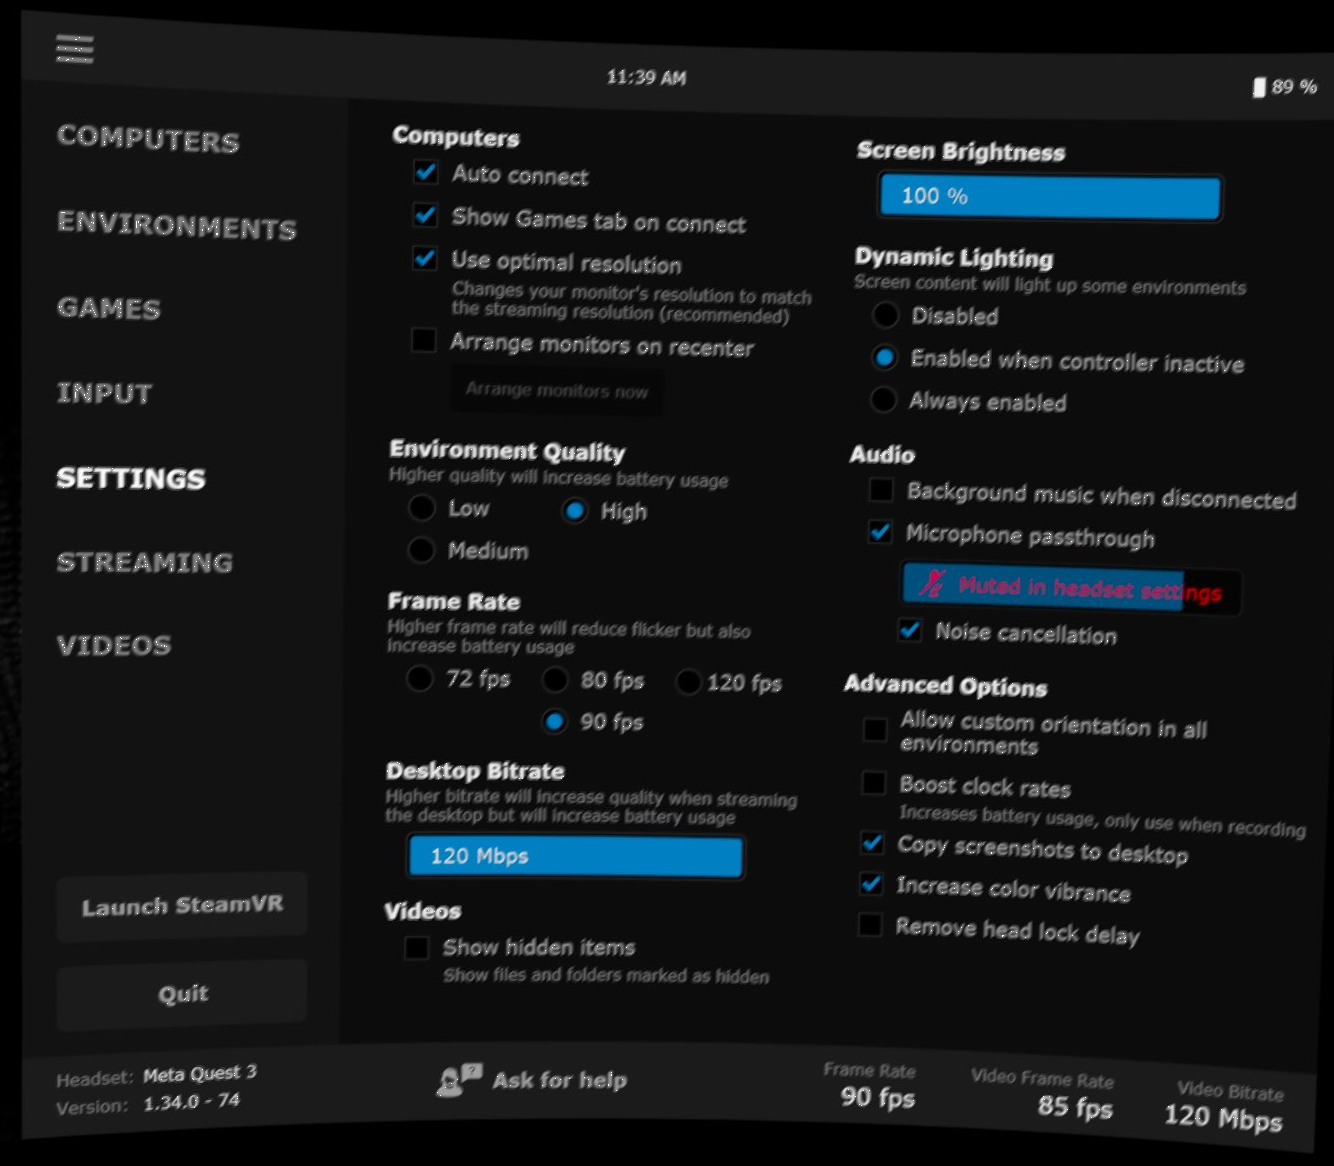
The Settings tab doesn’t affect the game. That is on the next tab Streaming.
VR Graphics Quality
Affects render resolution + encode width. Higher = better quality, more GPU + network load.
The encoding width is 2/3 of the render resolution. Godlike for Quest 3 has a render resolution of 3072 x 3216 and an encoding width of 4128 to drive the two 2064 x 2208 displays.
Frame Rate
Personal preference. Higher is smoother but heavier on GPU/network. You can change the frame rate without having to restart the game despite the warning text at the top of VD.
VR Bitrate
Leave on auto unless you’re optimizing with the performance overlay and can see when the network is not able to keep up. Optimize VR Bitrate before graphics.
Sharpening
Increase from the default. I use 100%.
VR Passthrough
Turn off.
Gamma
Adjust the game’s brightness.
Synchronous SpaceWarp (SSW)
Avoid unless motion sickness demands it. It adds fake frames, causing blur.
Snapdragon
Doesn’t hurt to try it but it’s unlikely to help at higher resolutions.
Video buffering
Some say to turn this off and VD says to leave it on. It can add latency when a frame is dropped.
Center to play space, Track controllers, Forward tracking, Increase color vibrance, Increase video nominal range
These won’t affect performance or clarity.
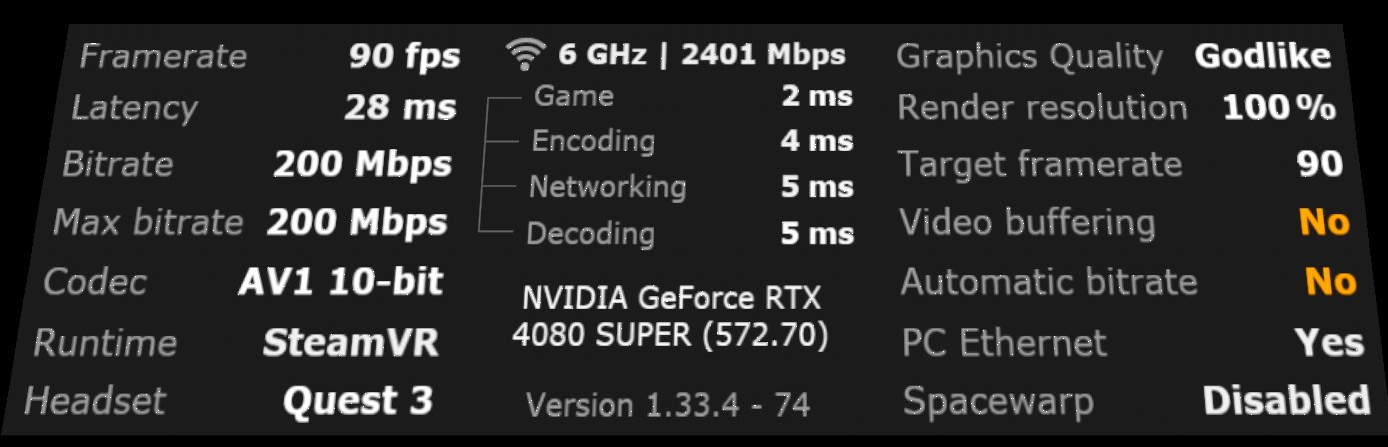
Performance Overlay
Enable during tuning. Shows frame drops, latency spikes, and more.
Performance Overlay
Toggle it with both joystick clicks (crouch first to avoid jumping).
I also recommend fpsVR ($4 on Steam). It works alongside VD’s overlay to pinpoint performance bottlenecks.
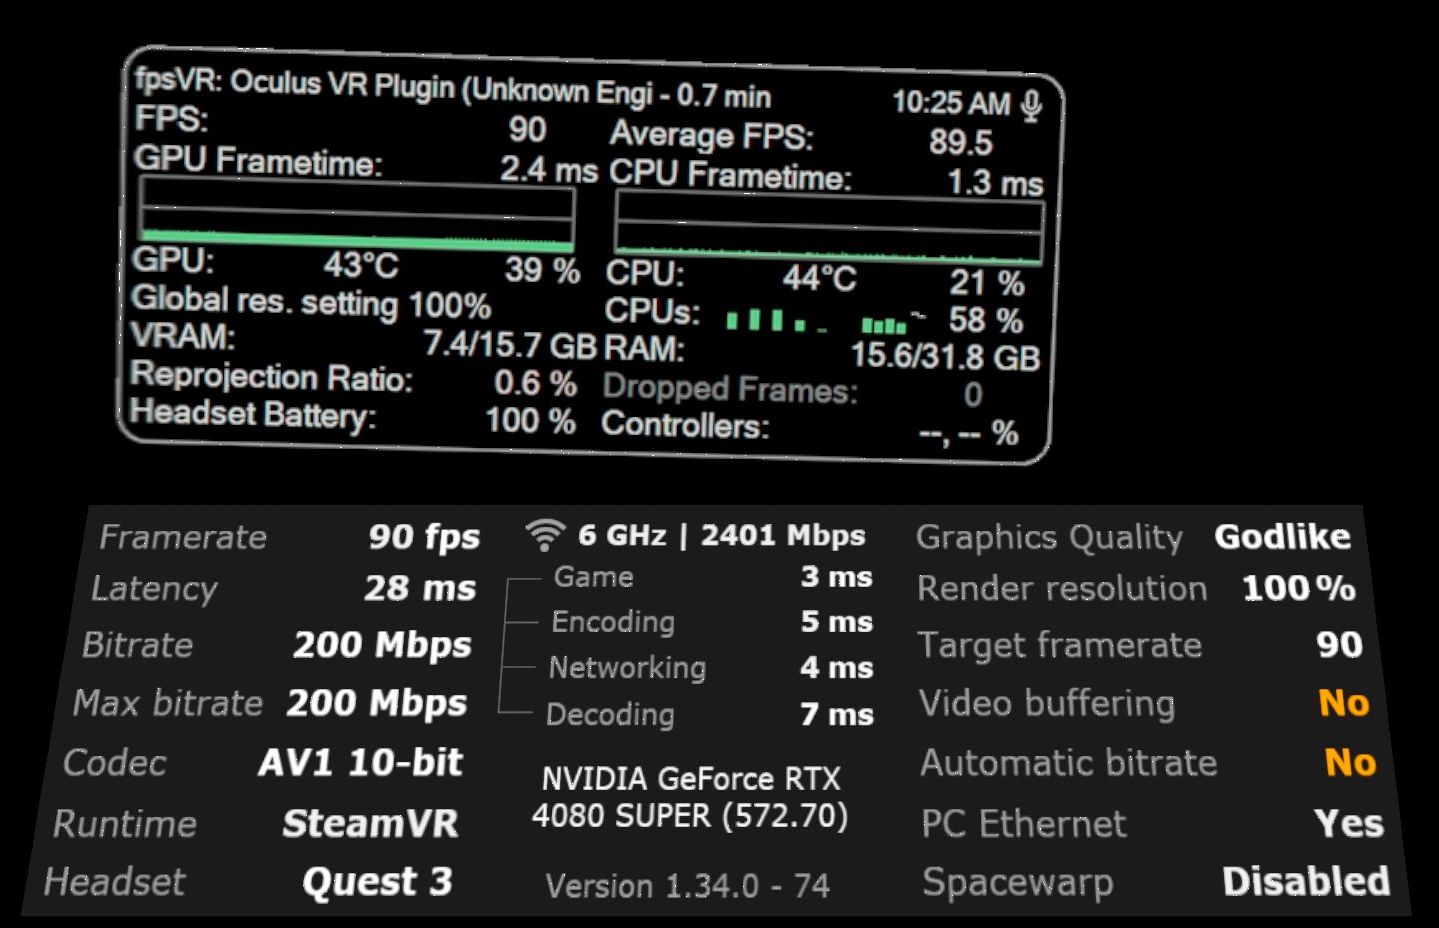
You can’t optimize without some sort of profiler. VD comes with one. I also recommend fpsVR which is on Steam for $4. The profiler will let help you identify problems and see the impact of settings changes.
Framerate: Must stay consistent for smooth gaming. If it frequently drops, adjust your performance settings.
Latency: Under 40ms is ideal. Yellow is bad.
Bitrate: Should stay close to your max.
Codec / Runtime / Headset: For reference.
Wi-Fi Link Speed:
866 Mbps = Wi-Fi AC
1200 Mbps = Wi-Fi AX at 80MHz
2401 Mbps = Wi-Fi AX at 160MHz
About a third of your link speed is usable for VR streaming.
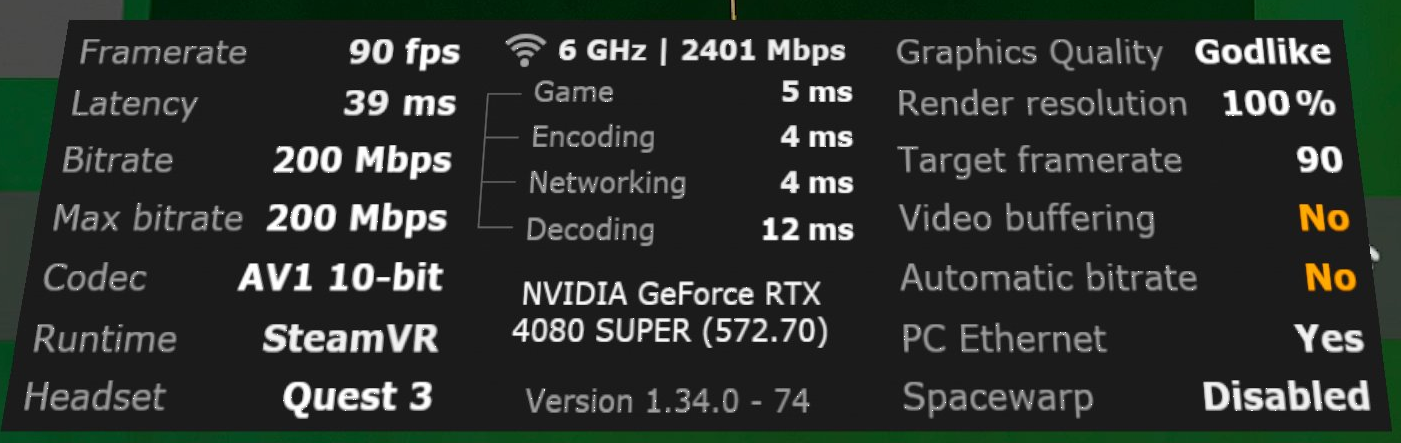
Latency Breakdown
Look here when things stutter:
Game: GPU bottleneck (lower in-game settings).
Encoding: GPU packing delay.
Networking: Router and networking issues.
Decoding: Headset load. 12 ms to 15 ms is usual for AV1 or HEVC.
Watch for yellow. White numbers are normal.
Note: AV1/HEVC at high bitrates sometimes cause spikes on NVIDIA cards. Try lowering to 120–150 Mbps if needed.
Graphics quality
For reference
Render resolution
Aim to keep this at 100%. The graphics quality presets use resolution values that work well together. SteamVR and in-game graphics settings can increase this value. It’s better to bump up to a higher VD graphics quality than cranking the render resolution up. High render resolution values will look better on your PC but the headset won’t look much better. That bigger rendered resolution has to be resized.
Target framerate / Video buffering / Automatic bitrate
For reference
PC Ethernet
Should be Yes. You will struggle if your PC is connected wirelessly.
Spacewarp
If not Disabled, it will let you know when your PC needs help from your headset to keep steady frames.
ExfilZone Settings
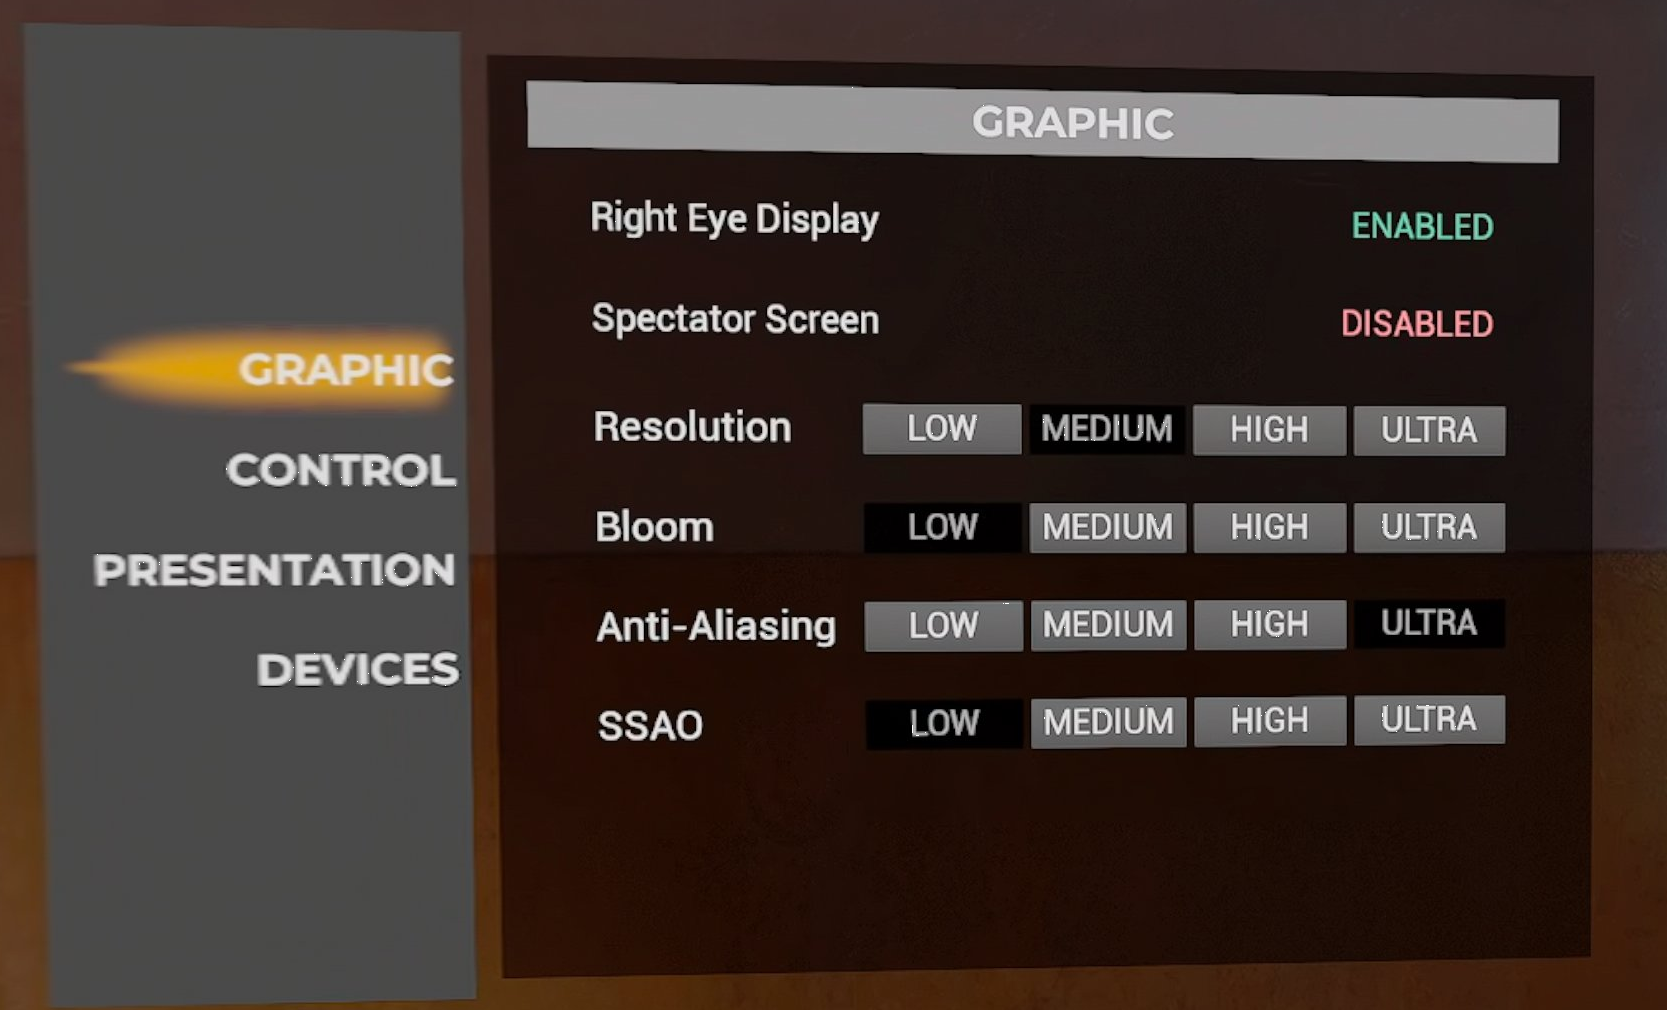
Right Eye Display and Spectator Screen
Won’t affect performance.
Resolution
This affects a collection of settings for image quality. It affects resolution. Low is 70%, Medium is 100%, High is 110%, and Ultra is 120% render resolution. I highly recommend leaving it on Medium. Resolution also changes post processing settings that cause more strain on your GPU. Medium ends up being crisper than high and ultra.
Bloom
No noticeable performance hit. Use what looks good.
Anti-Aliasing
Anti-aliasing is huge. It’s a huge hit to your GPU but it’s also a huge tool for improving clarity. It reduces jagged edges and the marching ants effect. Adjust it up for clarity and down for performance while in raids.
SSAO
I’m not sure what is going on with this screen space ambient occlusion (SSAO) implementation but set it to Low. In addition to taxing your GPU, it makes things look worse at higher settings. Look at a boulder and increase SSAO and you’ll see weird banding on the texture.
Engine.ini
Adjusting Engine.ini is more useful for other Unreal Engine games but there are a couple of tweaks that still work for EZ. As I mention in Clearing User Data, Engine.ini is located at
%localappdata%\Contractors_Showdown\Saved\Config\WindowsNoEditorI came across a post claiming the Contractors devs recommended certain Engine.ini tweaks but they do not seem to work now. If someone is having success, let me know!
Gamma
Add these two lines at the bottom of your Engine.ini file. Adjust the value up or down as needed.
[/Script/Engine.Engine]
DisplayGamma=2.3
Grass
The game adjusts your grass detail up and down based on your hardware. So more powerful computers are hit with even more taxing grass. Add this to your Engine.ini file to set grass to what a low-end PC would see.
[ConsoleVariables]
foliage.DensityScale=0.5
grass.CullDistanceScale=0.5
grass.DensityScale=0.5
Works in Progress
I really want to improve the Level of Detail (LOD) and culling that happens in the game. I know what should be modified but it doesn’t have an effect. Hop on the Deep Dives Discord if you have any ideas.
Bonus Content - Lens Distortion
If each eye’s display on Quest 3 is only 2064 x 2208 pixels, why is Virtual Desktop trying to render 3072 x 3216 pixels? Isn’t that a waste? Actually no. 3072 x 3216 is what you need so you have 1:1 coverage at the center of your vision. Say what? I’m not an expert like Guy Godin, but here’s the rundown.
You see a cube in VR. The light you see passes through the headset’s lens. The curvature of the lens causes a pincushion effect.

In order for you to see the cube properly, the image sent to the headset must be distorted in the inverse way, called barrel distortion.

Like me after Thanksgiving dinner, the center has bulged outwards and the pattern is stretched. The image that is encoded is still made of square pixels though. So you need more pixels rendered near the center of the image to make up for the distortion and inverse distortion. How many more? According to Godin, it’s right around what Godlike Virtual Desktop renders, or ~1.45x of the display resolution for Quest 3. At Godlike you’re rendering 9.88 megapixels at 80+ fps. For reference, 4K video is 8.29 megapixels. That’s why optimization is so important.
If you liked this, consider supporting my research.